Root Cellars: Design, Build, & Operation
- Apr 27, 2025
- 6 min read
Updated: May 21, 2025
On the evening of Earth Day, April 22, 2025, 20 of us gathered at Riverbend Farm in Delano. We were eager to learn more about root cellars, and, thankfully, Greg Reynolds, long-time owner and operator of the farm, was a willing teacher. It was a beautiful day to learn about efficiently storing food with the help of the earth. As Greg shared about how he came up with his particular design, tailored to his particular location, I busily scratched what details I could on paper and have tried to summarize them here. Hopefully some of this will be helpful if you are considering building your own root cellar or would just appreciate tips on how to operate one you already have. You can also find some simpler options and a book recommendation toward the end of this post.
A Little About Greg
Greg is a farmer, and after having managed his own vegetable farm for three decades, now manages the gardens at Gale Woods Farm in Minnetrista. Prior to farming, he was an engineer. He lives with his wife, Mary, in Delano, and still grows plants to generate seed for smaller seed companies, such North Circle Seeds, Experimental Farm Network, and Cultivating the Commons. Greg's dad was a concrete worker, and he would often help him when he was younger. Greg's experience and knowledge in concrete work was helpful for building his type of cellar.
Root Cellar Considerations
Greg prefaced his talk by saying that he can't teach us everything about how to build your own cellar, but he can share about some of the things he had to think about when designing and building his.
Three variables you need to be thinking about are temperature, humidity, and ventilation. Naturally, you want the temperature to be above freezing. In the 35-40 degree range is good. You want cold air in to cool the cellar, but not too cold. When temperatures dip below zero, he adds a cap to plug the vent out the back and top of the cellar. This also helps keep humidity in.
If humidity gets too low, your vegetables will dry out. If it gets too high, they will rot. So, you need to maintain a balance. Cold winter air is dry, so you don't want too much of this coming in. However, you do need airflow, which the air intakes and vent help achieve. Otherwise, stagnant air can lead to mold and mildew.
Having a light can be very helpful. If you run electricity to your cellar, you may also have the option of running a small heater if needed. Access to water is also helpful, especially in winter months when you may need to water your vegetables. Greg has a hose in his cellar that he uses to water down his vegetables. He simply runs the water over them to add moisture. He knows his veggies need to be watered when his Lacinato kale, which he has planted in wood shavings (horse bedding), starts to wilt. A good amount of moisture is when the wood shavings are wet, but when you squeeze them, they should not leave a lot of water on your hand. He waters his vegetables every 3-6 weeks, and more often, every 3 weeks, when it's very cold and dry.

Many people have a dirt floor to their cellar. Greg had a cement walkway through the middle of his, with gravel covering the areas on the sides where the vegetables are stored. The soil beneath Greg's cellar is very sandy, and water tends to drain away easily. The gravel also allows for good drainage.
When thinking about where to build your root cellar, as close to your house as possible is best. You don't want to have to go far, in winter especially, to get your produce. If you have a hill you can build into, this is ideal because then you can walk straight in instead of having to descend down a set of stairs. This is also very nice when using a wheelbarrow.
You'll need to build your structure, and then bury it. Greg's cellar is 10x12'. The roof must support a lot of weight. His roof has 8,000 lbs of concrete, and it supports 12,000 lbs of sand and dirt. You must have good footings - 12x12 or 18x12 - and a strong foundation. Rebar reinforcement is important.
Here are some drawings Greg did before building his cellar.


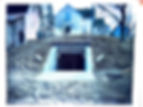
Greg used concrete block for his walls. Filling the corners is important. Also very important is making sure everything is square, level, and straight. Otherwise, you will end up with cracks in your walls. You'll also want to make sure your exterior doors are sturdy and can support the weight of snow and people. He included two sets of doors to create a dead air space.


In summer, he would open up the cellar and let it dry out, except when it was really hot. In the fall, they would open it again to let the cold air settle in and cool the cellar down. The cellar relies on passive ventilation with the two smaller low vents (one on each side of the cellar) and one large high vent. The pipes going out are elbowed.


If you'll be storing apples, keep in mind that they emit ethane, which can cause other nearby vegetables to ripen. So, it's best to store them in a space of their own where the air does not affect other crops.
Greg stores root crops, such as carrots, in the cellar. Winter squash and onions, however, he likes to keep in his basement as they prefer warmer temps in the upper 50s and 60s and dryer air.
He sorts out "rotters," as rot will spread and affect other nearby vegetables. A way to help prevent the spread is to store your vegetables in a way so that they do not touch each other. You can do this with carrots, for example, by layering shavings with the carrots.
Other Simple Options
Another simpler option is what's called a "pit root cellar." You dig a hole as far down as you can reach and set 6-8 hay bales out beyond the sides to keep the ground warm around the hole. You can store separate breathable bags (such as woven grain or sweet corn bags) of potatoes, carrots, beets, and turnips in the hole. Use a bag of dry leaves to plug the hole and set hay bales on top.
Another simple option is to dig a trench as wide as a hay bale is long and 3' deep and 40' long (this dimension can vary). Stack bags of root vegetables in the trench, put a tarp on top, and put hay bales on top to keep warm. Add another tarp on top of the hay bales to keep them dry. No watering is needed with this method; the vegetables get moisture from the earth.
You can also store veggies in a barrel and build a mound over it.
You can find many other designs in this book that Greg recommended.


Our guide for the evening also kindly gave us a tour of his greenhouse, which some of the attendees had been curious about. Here is a photo of his seedlings, which were started in this mini hoop enclosure. According to Greg, you can get the pipe for the hoops from Menards, and he bent his around a tractor tire.
A big THANK YOU to Greg for teaching this class!
